
AWS Bedrock - Suspicious message detection

The main role of any IT department is to enhance business capacity and make a real impact when dealing with technologies. As an internet user, I often come across various e-commerce platforms and use them to buy different items, whether it's a T-Shirt, fryer, car or even a house. Regardless of the product, I am always a buyer, and the person on the other end of the transaction is the seller.
You are looking for some products on DealOfDay and find one that you are interested in buying. You reach out to the seller either by asking for more details or expressing your interest in the product. DealOfDay provides a messaging feature to facilitate communication between buyers and sellers. However, some customers have reported receiving suspicious messages from sellers, which could potentially be fraudulent. To prevent such problems, the DayOfDeal product team has decided to implement real-time fraud detection to better protect the system and its users.
Design
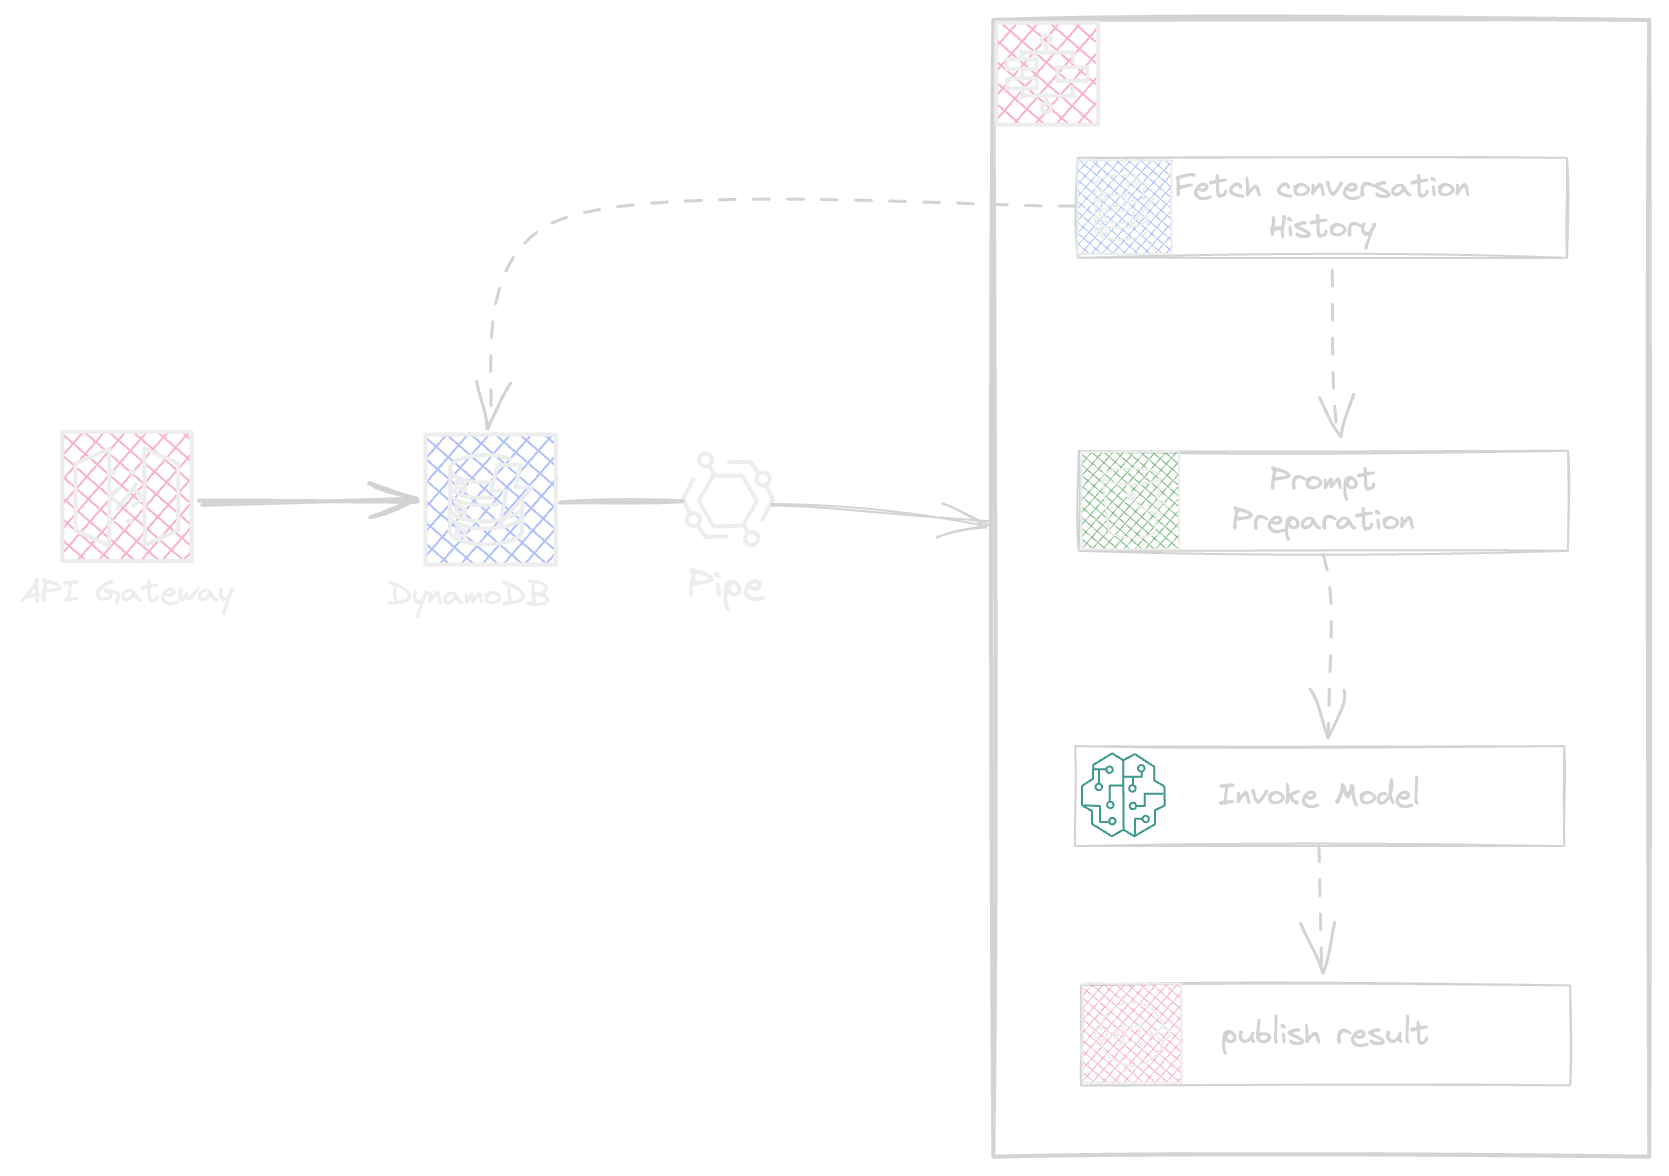
The starting point is an Apigateway that connects directly with the conversation Dynamodb table. If you want to learn more about direct integrations and how API gateway interacts with other AWS services like DynamoDb, I previously wrote about those integrations and their behavior. You can find more information about it ( Here ).
The source code here
Triggering State Machine
Using the event bridge Pipes to integrate the DynamoDb streams and step function is as easy as the following snippet
new CfnPipe(this, 'ConversationTablePipe', {
      roleArn: pipeRole.roleArn,
      source: this.conversationTable.Table.tableStreamArn!,
      sourceParameters: {
        dynamoDbStreamParameters: {
          startingPosition: 'LATEST',
        },
        filterCriteria: {
          filters: [{
            pattern: `{
              "eventName": [ "INSERT" ]
            }`}]
        }
      },
      target: this.stateMachineStack.stateMachine.stateMachineArn,
      targetParameters: {
        stepFunctionStateMachineParameters: {
          invocationType: 'FIRE_AND_FORGET',
        },
        inputTemplate: `
          {
            "Id": <$.dynamodb.NewImage.Id.S>,
            "message": <$.dynamodb.NewImage.message.S>,
            "timestamp": <$.dynamodb.NewImage.timestamp.S>
          }`
      }
The pipe reads from DDB streams and invokes the state machine asynchronously.
Conversation History
The solution receives the messages one by one, having messages individually is interesting but as a conversation needs to keep track of a contextual exchange we need to register all conversations to give a context back to Bedrock, this helps to prepare a better Prompt and leading the LLM provide a better result.
The DDB database keeps track of all messages in a conversation by keeping a Conversation Id as PK alongside the message and the message submission timestamp.
| PK | Timestamp | Message |
| o10TkLBnRjF9sNx65xaRB | 2024-02-22T19:40:03+00:00 | Hello, i m interested and would like to schedule a visit, when is your preferred schedule for next week? |
The workflow
The workflow consists of the following steps
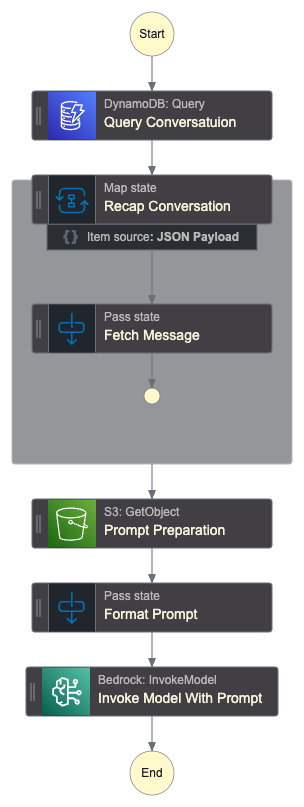
The Workflow can be described as below
Query DDB Table per ConversationId
Fetch Prompt Markdown from S3 bucket
Transform The prompt using a Pass State
Call Bedrock Model to get results
The snippet represents the workflow implementation using AWS CDK
const defintion = new CustomState(this, 'Query Conversatuion', {
      stateJson: {
        Type: 'Task',
        Resource: "arn:aws:states:::aws-sdk:dynamodb:query",
        Parameters: {
          TableName: props.Table.tableName,
          ScanIndexForward: true,
          KeyConditionExpression: `Id = :id`,
          ExpressionAttributeValues: {
            ":id": {
              "S.$": JsonPath.stringAt('$[0].Id')
            }
          }
        },
        ResultSelector: {
          'messages.$': '$.Items'
        },
        ResultPath: '$'
      }
    }).next(new CustomState(this, 'Recap Conversation', {
      ....
      }
    })).next(new CustomState(this, 'Prompt Preparation', {
      stateJson: {
        Type: 'Task',
        Resource: "arn:aws:states:::aws-sdk:s3:getObject",
        Parameters: {
          Bucket: props.Bucket.bucketName,
          Key: "prompt.txt"
        },
        ResultSelector: {
          'body.$': '$.Body'
        },
        ResultPath: '$.prompt'
      }
    })).next(new Pass(this, 'Format Prompt', {
      parameters: {
        "output.$": "States.Format($.prompt.body, $.messages)"
      }
    })).next(new BedrockInvokeModel(this, 'Invoke Model With Prompt', {
      contentType: "application/json",
      model: {
        modelArn: props.modelArn,
      },
      body: TaskInput.fromObject(
        {
          inputText: JsonPath.stringAt('$.output'),
        },
      ),
    }));
Run the Solution
After deploying the solution we can call the API gateway giving a message, a conversation id and a message date time.
{
    "conversationid": "Qt-K5wvjjF4O4m-qSYWtW",
    "timestamp": "2024-02-22T19:40:03+00:00",
    "message": "Buyer: Hello i am interested in your house, can we fix a visit?"
}
Sending the request will trigger the step function workflow
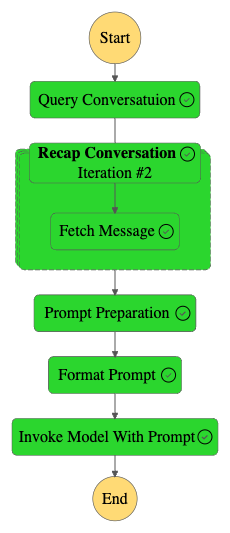
These are the most whole workflow steps from start to the end resulting in a Suspicious rate being 0 or 1.
The Prompt
This is a really simple part of this example, defining a prompt for this use case was not too hard, The prompt is a predefined paragraph that includes a variable placeholder.
You are a conversation moderator on the DeadOfDay site and you are monitoring the following conversation between these two people: ' {} ', Rate me the suspicious nature of this conversation based on the messages exchanged. Only answer me with 1 if the conversation seems suspicious to you and 0 otherwise.
You. can find the ' {} ' placeholder in the middle of the prompt, this is the way to let the ASL replace it with the corresponding conversation.
States.Format($.prompt.body, $$.Execution.Input[0].message)
Bedrock results
Sending the prompt to Bedrock is simple using the step-functions service integration, the state machine definition will be as below
{
  "End": true,
  "Type": "Task",
  "Resource": "arn:aws:states:::bedrock:invokeModel",
  "Parameters": {
    "ModelId": "arn:aws:bedrock:us-east-1::foundation-model/amazon.titan-text-lite-v1",
    "ContentType": "application/json",
    "Body": {
      "inputText.$": "$.output"
    }
  }
}
Calling bedrock and based on our prompts the results will be 0 or 1 to indicate 'Is It Suspicious?', 1 means Yes, and 0 No.
Here is the Bedrock response for the test message shown above.
{
  "Body": {
    "inputTextTokenCount": 77,
    "results": [
      {
        "tokenCount": 2,
        "outputText": " 0",
        "completionReason": "FINISH"
      }
    ]
  },
  "ContentType": "application/json"
}
The outputText represents the LLM answer.
Now, Let's continue the conversation
{
    "conversationid": "Qt-K5wvjjF4O4m-qSYWtW",
    "timestamp": "2024-02-22T19:54:44+00:00",
    "message": "Seller: Yes sure, just you need to send me a 5000 dollar of deposit before the visit"
}
The above request will result in a Suspicious message detection if we apply a context, being the previous conversation message
- Buyer: Hello, I am interested in your house, can we fix a visit?
- Seller: Yes sure, just you need to send me a 5000 dollar of deposit before the visit
The importance of context
On 7 April 2020, I became a dad, this was a big step but at the same time during frustration I learned a lot, Never say a single Yes or No, This is not helpful when you talk with a brain, a brain needs a context either the result will not be effectively corresponding to the wished one, but it can be helpful in a second phase.

Giving the second request ( the seller suspicious message) without providing the conversation history results in the following response from Amazon Titan Text V1 Lite, With an Output text as a '0' meaning that the message is not suspicious.
{
  "Body": {
    "inputTextTokenCount": 83,
    "results": [
      {
        "tokenCount": 2,
        "outputText": "0",
        "completionReason": "FINISH"
      }
    ]
  },
  "ContentType": "application/json"
}
To better prove the need for a context I tried to invert the conversation message order just by setting the 'ScanIndexForward: false' this will revert the query order.
Having the previous conversation as
Buyer......
Seller......
The inverted conversation will be as
Seller.....
Buyer ....
Having a suspicious conversation because of seller message previously, this time the LLM will indicate the conversation as an unsuspicious conversation even having the seller message inside.
Enjoy Reading